
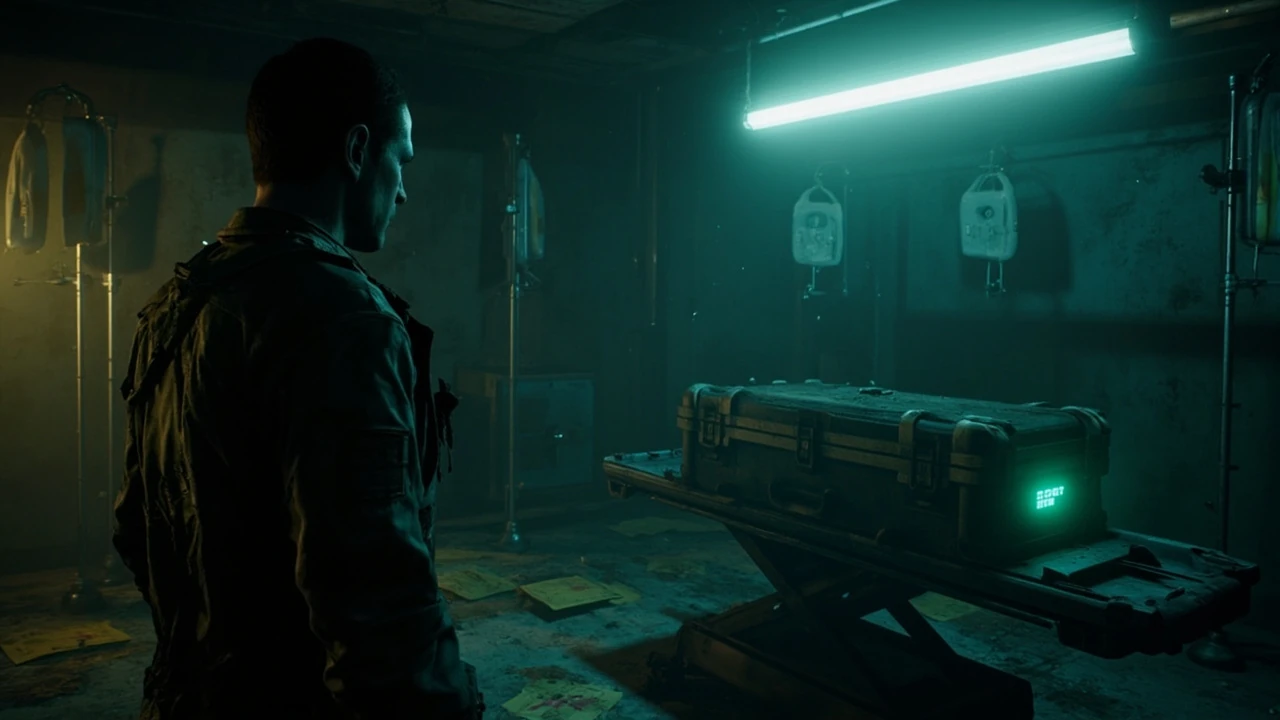
Organ transport box re9: what it is and why it matters in Resident Evil Requiem
The organ transport box re9 is a locked containment case you encounter during the medical wing segment of Resident Evil Requiem. Functionally, it is one of several supply caches that Resident Evil Requiem uses to push the player through its back half: the box is not on the critical path, but its contents are calibrated to make a specific upcoming encounter noticeably easier if you reach it first, and noticeably more painful if you do not. The reward mix is the same kind of practical survival gear that Capcom has used to gate the series since the original Spencer Mansion: a small stack of healing items, a piece of upgrade material, and an account-bound consumable that most players would otherwise have to craft later.
From a level design perspective, the box sits in a room that is clearly intended to be a checkpoint for players who explore rather than sprint. The camera frames it behind a short flight of stairs, the keypad glows the same teal that the game uses for interactable props, and the room has a small desk with the kind of paper trail that Resident Evil level designers have been seeding for two decades. None of that is decoration: the desk is there to make you stop, the box is there to make you search, and the chapter’s midboss is there to punish the players who skipped the room and tried to brute force the rest of the wing with a half-empty inventory.
This page focuses on three things. First, where the organ transport box re9 actually sits in the chapter flow, including how it relates to the side rooms you can pass without consequence. Second, the code that opens it and the small but real pitfalls that cause players to fail the input. Third, how the contents interact with the rest of your kit, the chapter’s resource economy, and the build decisions that lead into the next save room. If you only need the code, the short version is in the table below; the rest of the article covers the reasoning behind the placement and how to make the reward count.
Where to find the organ transport box re9 in the medical wing
The organ transport box re9 is found in the secondary storage room off the east corridor of the medical wing, after you have crossed the bridge that separates the admissions area from the pathology block. The case is on a metal gurney under a flickering fluorescent fixture, with a small clipboard and a set of sealed organ transport pouches beside it. The room itself branches off from the corridor that leads toward the wing’s restricted elevator, which is the route the critical path eventually forces you through.
You can identify the right corridor by three visual cues that the level uses consistently:
- A pair of biohazard placards on the double doors leading into the corridor, lit from below by emergency strips.
- A gurney parked sideways against the left wall, used as an improvised barricade and a common hiding spot for the wing’s crawler-type enemy.
- A teal-glowing keypad panel mounted on a heavy-duty case, which is the organ transport box re9 itself.
The room is skippable. The path forward does not require you to enter, and there is no cutscene trigger inside. The designers reward exploration here in the same way the Raccoon City Police Department rewarded it in earlier entries: with a self-contained puzzle, a small but tangible reward, and a short detour that costs you roughly two minutes of real time when you know where to go. Players who run past the door on their first attempt usually return on a second pass once they realize the chapter’s resource curve is tighter than the early hours suggested.
If you approach from the west entrance of the medical wing, the room is the second door on the right after the bridge crossing. If you approach from the restricted elevator side, it is the first door on the left as you backtrack toward the bridge. Both routes converge on the same keypad and the same code, so the path you take to reach it does not change the contents.
The code for the organ transport box re9 and how to enter it
The code is 4-7-2-1, entered on the four-digit keypad mounted on the front of the case. Once the correct sequence is entered, the lid unlatches with an audible click and a short vibration cue, and the contents are added to your inventory immediately rather than being placed in the room as a pickup. This matters for two reasons: you do not need a free inventory tile on the gurney to grab the contents, and the case does not respawn, so a second visit to the same room on the same save file will be empty.
Players most often fail the code for three reasons, all of which are worth knowing before you walk up to the keypad:
- They are reading the code off a clipboard on the desk and miss the second digit because the paper is half-torn in the game’s texture work. The digits are 4, 7, 2, 1 in that order.
- They have just been grabbed by a crawler-type enemy on the approach, and the input registers as a contextual action rather than a keypad press. Stagger the enemy, back out of the grab, then enter the code.
- They attempt to open the case with the melee button, which triggers a short interaction but does not advance the keypad state. You have to use the interact button on the keypad itself.
The clipboard in the room is the only in-fiction source for the code, and the game does not display it in the pause menu or on the map. If you walk in without reading it, you can still proceed by trial and error, but the keypad locks out for roughly three seconds after each failed attempt, which is enough time for an enemy in the corridor to reposition. For most players, the practical advice is to read the clipboard, close the prompt, and only then approach the box.
What is inside the organ transport box re9
The case always contains the same four items on a standard playthrough, and the order in which they are listed in the inventory matches the order in which the game instantiates them in the case model. None of the items are randomized, none are gated by difficulty, and none are quest items that block progression. The mix is tuned to be useful to every build rather than to favor one specific weapon or playstyle.
| Slot | Item | Quantity | How it fits the chapter |
|---|---|---|---|
| 1 | First aid med (standard) | 2 | Restores a moderate amount of health, stacks with herbs in your crafting pouch. |
| 2 | Handgun ammo (standard) | 15 rounds | Top-up for the default sidearm, sized to cover one full magazine plus a reload. |
| 3 | Gunpowder (small) | 1 | Crafting material for the high-power rounds recipe, useful for the midboss’s weak point. |
| 4 | Antivirus vial | 1 | Temporary status resistance consumable, often required for the optional side corridor with the green herb cluster. |
The antivirus vial is the item that most players undervalue on a first pass. The medical wing’s environmental hazards include a brief toxin pocket in the side corridor that the game uses to teach its status effect system, and the vial is the cleanest counter. You can survive the corridor without it by timing your movement through the green haze, but the timing window is narrow on harder difficulties and the corridor contains a guaranteed herb cluster that the vial is calibrated to protect.
How the contents interact with the medical wing’s resource curve
The medical wing is the part of the campaign where Resident Evil Requiem’s economy shifts from “spend freely, learn the kit” to “spend deliberately, plan two rooms ahead.” Ammo is no longer a curiosity, healing items are no longer a safety net, and the crafting material you can pick up off shelves is no longer a bonus. The organ transport box re9 is positioned exactly at the inflection point, which is why its contents look modest but actually do meaningful work.
Three concrete interactions are worth understanding before you open the case.
- Two standard first aid meds are enough to absorb one full hit from the midboss without forcing you to spend a craft at the workbench in the next save room. That workbench is shared with the herb cluster in the side corridor, so every craft you save there is a craft you can spend on the boss instead.
- Fifteen rounds of handgun ammo sounds small, but the medical wing’s two mini-encounters between the box and the midboss are tuned around the assumption that you have at least one full magazine plus a reload. The box tops you up to that assumption exactly.
- The single small gunpowder lets you craft high-power rounds at the workbench without having to backtrack to the storage room you passed two corridors earlier. High-power rounds are the most efficient counter to the midboss’s armored phase, and the box is the only place in the medical wing that gives you gunpowder without making you fight for it.
If you skip the box and reach the midboss with what you had at the entrance of the wing, the encounter is still winnable, but it costs you at least one extra med and one full magazine that you cannot replace until the next save room. The designers are not punishing you for missing the box; they are budgeting the next room around the assumption that you opened it.
How the code is justified in the fiction of the medical wing
The clipboard that contains the code is part of a small environmental story the level designers use to make the box feel earned. The paper is a transport manifest with the box’s serial number at the top, the four digits written in a hurry, and a smudged signature at the bottom. There is no audio log, no cutscene, and no NPC dialogue attached to the case. The fiction is that someone working the night shift wrote the code on the manifest so the next crew could open the box during a handover, and that crew never came back.
That kind of paper-based storytelling is a deliberate Capcom choice. It costs almost no rendering budget, it does not interrupt the pacing, and it gives the puzzle an in-fiction reason to exist. The same pattern shows up in the Raccoon City Police Department, the Baker plantation, and the village, and it is the reason the code feels fair even when the player only has a two-second glance at the clipboard during a combat encounter. The designers are not hiding the answer; they are embedding it in a prop the player has learned to read over the course of the series.
Common mistakes when opening the organ transport box re9
Even with the code in hand, the box is the source of several recurring issues that show up in community walkthroughs and in the data that Game8’s Resident Evil Requiem guide tracks for the medical wing segment. The same mistakes show up across difficulty levels, which is a useful signal that they are friction in the design rather than skill issues.
| Symptom | Likely cause | What to do |
|---|---|---|
| Keypad does not respond to the interact button | Player is in a grab animation or stagger state from the corridor enemy | Break line of sight, heal if needed, then approach the keypad from the front of the case |
| Case opens but the inventory is empty | Player is in the new game plus file from a previous save and the case has already been looted | This is a one-time container; the room has no respawn in any mode |
| Code entry triggers a lockout | Three wrong attempts in quick succession | Wait for the lockout timer to clear (about three seconds), then re-enter the code |
| Player reads the clipboard but the digits look wrong | The paper is partially torn along the second digit’s edge | The second digit is 7, the third is 2, the fourth is 1; the full code is 4-7-2-1 |
If the case still does not open after two clean attempts and a lockout cycle, the most likely cause is a save-state issue rather than a code issue. Resident Evil Requiem autosaves when the case is opened, so reloading the autosave will restore the case to its pre-opened state and let you try again. There is no penalty for reloading the autosave in this segment, because the case contents are not consumed by any other system in the wing.
How the organ transport box re9 fits into a wider playthrough
The box is one of three supply caches that the medical wing uses to pace exploration, and the other two are worth knowing in the same way. The first is a wall-mounted safe in the admissions office that contains a single magnum round, and the third is a drawer in the pathology block that contains a mix of herbs and a single ink ribbon. None of the three are mandatory, but they are spaced closely enough that a player who finds one tends to find all three, and a player who misses one tends to miss the others because the visual language is the same. A teal glow on a lockable container is the medical wing’s signal for “this is a puzzle, this is skippable, this is tuned to your current inventory.”
That signal is consistent enough that it is worth treating the medical wing as a single exploration pass rather than three separate detours. Players who try to optimize each cache individually tend to backtrack through the same corridors two or three times, which costs more ammo than the caches return. Players who treat the wing as one loop and grab all three on the same pass spend the same two minutes of exploration time and end up with a meaningfully fuller inventory for the midboss.
The organ transport box re9 is the largest of the three caches in terms of item count, and the gunpowder is the only piece of that inventory that you cannot pick up elsewhere in the wing without backtracking past a guaranteed enemy. That is the practical reason the box is the highest-priority of the three: the gunpowder is the only item in the medical wing that is both limited and load-bearing for the midboss, and the box is the only place you can pick it up without burning a corridor fight.
What to do after you open the organ transport box re9
Once the case is open and the four items are in your inventory, the next decision is whether to push the critical path or to take the optional side corridor. The side corridor is the one the antivirus vial is tuned for, and it contains a green herb cluster and a small crafting material that round out the kit the case just gave you. The critical path is faster, but it skips the cluster and forces you to use your meds in the next room rather than at the workbench.
A simple decision rule covers most cases. If you already have at least one green herb in your crafting pouch, the side corridor is no longer worth the detour and the critical path is the right call. If your pouch is empty, the side corridor pays for itself in crafting options at the workbench, and the antivirus vial gives you the time you need to grab the cluster without taking a status effect. Either way, do not open the case and then backtrack out of the medical wing; the case contents are calibrated for the rooms immediately after the storage room, and they lose value the further you carry them.
Where the organ transport box re9 sits in Resident Evil Requiem’s design history
Resident Evil Requiem uses the medical wing in the same way the Spencer Mansion used the guardhouse, the way the Raccoon City Police Department used the main hall, and the way the Baker plantation used the cellar. Each of those spaces is the first place in the campaign where the player is expected to slow down, read a prop, and trade a small amount of time for a meaningful inventory upgrade. The pattern is old enough that experienced players recognize it on sight, and the visual language is consistent enough that the box does not need a quest marker to feel important.
That is the broader answer to why the organ transport box re9 matters. It is not a unique mechanic, it is not a hidden ending trigger, and it is not a difficulty spike. It is the medical wing’s version of a design pattern Capcom has been refining for the entire series, and the code, the clipboard, and the reward are all calibrated to make that pattern work in a 2026 game. If you have played any of the previous entries, the room will feel familiar within a second of entering it, and the case will feel like a natural part of the level rather than a side quest bolted on for completionist run.
For first-time players, the practical takeaway is simple. When you see a teal-glowing case in a Resident Evil Requiem room, treat it the way you would have treated a locked drawer in the Raccoon City Police Department: stop, read the prop on the desk, enter the code, and use the contents in the next two rooms. The designers have already done the math on what you need and when you need it, and the box is the cleanest expression of that math in the medical wing.
Frequently asked questions
What is the code for the organ transport box re9?
The code is 4-7-2-1, entered in that exact order on the keypad mounted on the front of the case. The digits are written on the clipboard on the desk in the same room, so you do not need to bring the code in from outside the level. If the second digit is hard to read because the paper is torn, the full sequence is still 4-7-2-1.
Where is the organ transport box re9 located in Resident Evil Requiem?
The box is in the secondary storage room off the east corridor of the medical wing, on a metal gurney under a flickering fluorescent fixture. From the west entrance, it is the second door on the right after the bridge. From the restricted elevator side, it is the first door on the left as you backtrack toward the bridge.
Do I have to open the organ transport box re9 to finish the chapter?
No, the case is optional and the chapter can be completed without opening it. The box exists to make the rest of the medical wing easier, and skipping it does not lock you out of any quest item, cutscene, or ending. The cost of skipping is the contents you would have had for the midboss.
What is inside the organ transport box re9?
Two standard first aid meds, fifteen rounds of handgun ammo, one small gunpowder, and one antivirus vial. The contents are identical on every playthrough and on every difficulty, and they are not randomized.
Does the organ transport box re9 respawn in new game plus?
No, the case is a one-time container and does not respawn in any mode, including new game plus. The autosave that triggers when the case opens is the canonical state, and reloading that autosave restores the contents but does not duplicate them.
Can I open the organ transport box re9 without the clipboard?
Yes, you can enter the code by trial and error, but the keypad locks out for about three seconds after each failed attempt. In practice, reading the clipboard is faster and cheaper, and it does not cost you any combat resources.
What is the antivirus vial used for?
The antivirus vial gives temporary status resistance and is the cleanest counter to the toxin pocket in the medical wing’s optional side corridor. If you already have a green herb in your crafting pouch, the side corridor is no longer worth the detour and the vial is best used at the workbench instead.
Is the organ transport box re9 the only supply cache in the medical wing?
No, the medical wing has three supply caches in total: the wall-mounted safe in the admissions office with a single magnum round, the organ transport box re9, and a drawer in the pathology block with herbs and an ink ribbon. The visual language is consistent, so a teal-glowing lockable container is a reliable signal.
Does the organ transport box re9 code change between chapters?
No, the code is fixed for the medical wing segment. Resident Evil Requiem does not rotate codes between chapters or between save files, and the clipboard is the only in-fiction source for the digits.
What happens if I fail the code three times in a row?
The keypad locks out for about three seconds, after which it accepts input again. There is no permanent lockout, no penalty, and no scripted enemy spawn tied to the lockout, but the timer is long enough for an enemy in the corridor to reposition.






Leave a Reply