
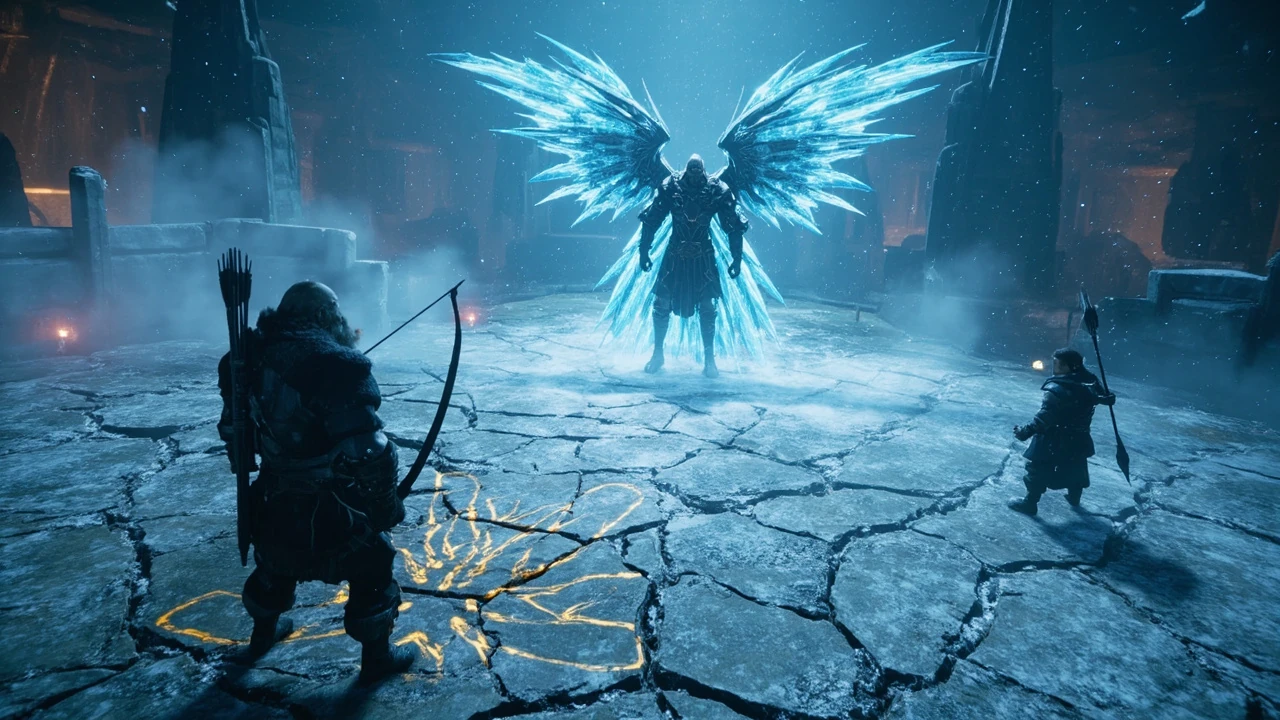
Gna in God of War Ragnarok: what the encounter actually demands
Gna is the secret post-game super boss in God of War Ragnarok, and the encounter rewards preparation more than reflexes. The fight only opens after the main story, the credits, and the final unlock conditions are satisfied, which means the gear, runic upgrades, and stat investments you bring to it are the result of dozens of hours of side content. A typical first attempt ends in a one-shot from a Bifrost-infused attack that the player did not realize was telegraphed, or a panic roll into a follow-up swing that the camera was already turning away from.
This guide focuses on the build, enchantment, and runic decisions that make the fight consistent, the encounter mechanics that decide whether a run survives the first minute, and the most common reasons players end up resetting the encounter rather than learning from a single attempt. It treats Gna as a systems problem first and a reaction test second, which is the framing that usually separates clean kills from hour-long grinds.
If you have not yet unlocked the fight, scroll to the prerequisites section. If you are already inside the arena and dying in the opener, the encounter-mechanics section explains the patterns that most often cause the early wipe.
Prerequisites: unlocking the Gna encounter
The encounter sits behind several layers of unlock conditions, and each layer can be a silent blocker for players who think they have finished the game. Treat the checklist below as a series of gates rather than a single switch.
- Complete the main story through the final story mission and watch the end credits. The arena is not available from the main path.
- Return to The Barrens area in Alfheim and locate the Mystic Gateway that becomes active only after the story concludes. The gateway is the entry point to the secret boss region.
- Equip a late-game weapon loadout for Kratos. Early-game blades or a starter axe with low runic levels will not survive the opener.
- Confirm that Atreus’s bow and summon abilities are upgraded. The companion contributes consistent ranged damage and interrupt pressure, and an unupgraded bow will leave openings you cannot close.
- Stock a full pouch of healing resources, a rage gem, and any resurrection-oriented relic that you have unlocked. The encounter is designed to drain resources quickly.
If any of these gates is not cleared, the arena will not appear, or the first attempt will end in one or two combos. Confirm each item before walking through the gateway so that an early loss is not blamed on the build when the real problem is a missing prerequisite.
Build philosophy for a super boss
A super boss is not a damage race. The design intent is to punish greedy openings, to combine several late-game status effects in a single combo, and to force the player to spend resources on defense before they can spend them on offense. The build that wins is the build that turns every defensive tool into a small window of damage, rather than the build that tries to skip defense entirely.
Three principles tend to separate consistent attempts from stalled ones.
- Stack status-effect resistance rather than raw armor. The encounter layers Bifrost, a stagger-prone frost effect, and a curse that drains runic energy. Resistance enchantments that mitigate two of these at once outperform a single high-stat chest piece.
- Keep the rage bar close to full between phases. A full rage bar is the only reliable answer to a one-shot opener, and it doubles as a panic button if a combo starts while you are out of position.
- Choose runic attacks that interrupt or stagger on hit. Damage-over-time runics look attractive on paper, but the encounter punishes long animations more than a single slow combo does.
That third point is often where players lose time. A runic attack that locks Kratos into a three-second animation while the boss teleports behind the camera is a reset, not a damage tool. Treat the runic slots as utility first and damage second.
Recommended stat and equipment priorities
The table below groups the equipment decisions into tiers based on what each one actually contributes to a clean kill. The ordering reflects the importance of each item for surviving the opener, not raw stat numbers.
| Slot | Priority tier | What it should do | Why it matters for Gna |
|---|---|---|---|
| Chest armor | Tier 1 | High defense plus Bifrost or curse resistance | Cuts the most common one-shot damage source |
| Wrist armor | Tier 1 | Runic cooldown reduction and a status resist roll | Keeps runic interrupts ready during phase transitions |
| Waist armor | Tier 2 | Health or stat boost with a small resist roll | Provides a buffer when resource spending goes wrong |
| Weapon attachment | Tier 1 | Stun or stagger on hit | Creates the small damage windows the build needs |
| Runic light attack | Tier 2 | Fast animation, single hit, low cooldown | Used to fill gaps between heavier runics |
| Runic heavy attack | Tier 1 | Stagger or interrupt on contact | Primary answer to teleporting recovery |
| Relic | Tier 1 | Healing, rage, or revive effect | Last-line recovery when resources are gone |
| Spartan Rage variant | Tier 2 | Either high burst or a defensive invulnerability window | Pick based on your confidence with the opener |
Tier 1 items are not negotiable. If any of them is missing, the build collapses against the opener even if the rest of the slots are well tuned. Tier 2 items are where personal preference starts to matter, and that is the right place to start customizing once the baseline is solid.
Enchantment and runic setup
The verified GamerGuides build summary for the encounter suggests pairing a Remedy of the Bifrost enchantment with a Regenerating Essence roll, and notes that Remedy of the Bifrost is the safer choice when Bifrost damage becomes a recurring problem in later phases. That trade-off is the right one to internalize before you start enchanting.
Use the list below as a starting point, then swap a single slot at a time so that you can feel the difference rather than guess at it.
- Chest enchantment: a high-roll Bifrost resistance or a curse resistance. Pick whichever status effect hit you most often in your last failed attempt.
- Wrist enchantment: runic cooldown reduction. The encounter cycles between long and short combos, and a runic attack ready a beat too late is often a missed interrupt.
- Weapon attachment: a stun-on-hit roll that triggers on a light combo finisher. Stun windows are the cleanest damage opportunities in the fight.
- Runic light: a fast single-hit option that recovers quickly. Save heavy runics for the opener and the phase transitions.
- Runic heavy: a stagger or knock-up that interrupts the teleport recovery. This is the single most important runic slot for consistency.
Resist the temptation to mix three different status-effect mitigations onto the same build. Spreading mitigation too thin turns every effect into a partial save, and partial saves are what lead to chained deaths where the player survives the first hit but dies to the follow-up.
Encounter mechanics that decide the run
Gna’s move set is built around three behaviors that the camera does not always telegraph clearly. Learning these is worth more than any single gear upgrade.
| Behavior | Visual tell | Player response | What goes wrong if you ignore it |
|---|---|---|---|
| Teleporting recovery | Brief shimmer behind the camera, audio cue | Hold a heavy runic attack ready, do not chase | Camera turns, you swing at empty air, follow-up lands |
| Bifrost combo | Slow wind-up with a glowing purple blade | Dodge away, then activate rage to bait the follow-up | Direct hit drains health and applies a stacking debuff |
| Summon adds | Brief arena pulse, secondary enemies spawn at range | Use Atreus’s summon to peel, then return to the boss | Adds pile on while you are locked in a heavy animation |
| Stagger punish | Long swing that ends in a planted weapon | One light combo, then back off | Greedy combos are answered by a one-shot counter |
The teleport recovery is the single most common cause of early wipes. The camera turns to find the boss and the player swings at where the boss used to be, which is exactly where the follow-up swing is now arriving. Holding a heavy runic attack for a beat after the shimmer stops that mistake cold, and it gives the camera time to settle before you commit.
The Bifrost combo is the second most common cause. A direct hit is recoverable with a healing resource, but the stacking debuff is what kills the run two phases later when the player’s effective health is suddenly half of what the bar shows. Treat the first Bifrost hit as the cue to back off and wait for rage, not the cue to push in for damage.
Phase-by-phase pacing
The encounter has three practical phases, and the pacing is different in each. The table below summarizes what each phase rewards and what it punishes.
| Phase | What the boss does | What you should do | What to avoid |
|---|---|---|---|
| Opener | Two fast combos, then a Bifrost opener | Block, dodge, save rage for the Bifrost | Spending rage on a light attack |
| Mid-phase | Teleport recovery, summon adds, mixed combos | Hold heavy runic, peel adds with Atreus | Chasing the teleport |
| Final phase | Longer combos, faster follow-ups, more Bifrost | Stay close, trade hit for hit using rage | Long animations, ranged kiting |
The opener is a test of whether the player built for survival or for damage. Players who try to burst the opener usually end up out of resources before the Bifrost swing lands, and the Bifrost swing is what the opener is designed to punish. A clean opener ends with full health, full rage, and one or two small cooldowns ticking down.
The mid-phase is where most attempts stall. The player handles the opener cleanly, gets confident, and then loses the run to a teleport recovery they did not expect. Slow down for the mid-phase rather than speeding up. The damage is already in the bank from the opener.
The final phase rewards aggression. The boss’s combos get longer but the openings between them get larger, and a player who has saved rage and runic cooldowns can trade hit for hit in a way that is not safe earlier in the fight.
Common reset causes and how to avoid them
Most resets fall into one of five patterns. Working through this list after a failed attempt usually identifies the real cause faster than repeating the fight.
- Spent rage on the opener. The opener is a defensive phase. If rage is empty by the time the Bifrost combo lands, the run is over before the real fight begins.
- Chased the teleport recovery. The camera turns, the player swings, and the follow-up lands. Hold the heavy runic and wait for the boss to reappear in front of you.
- Ignored the adds. Atreus’s summon is the cleanest answer. If you handle adds yourself, you are trading your positioning for a single trash mob.
- Stacked three different resistance types. Spreading mitigation across Bifrost, curse, and frost leaves every save partial. Pick two and stack them.
- Reset instead of learning. Resetting after a single mistake is faster, but it does not teach the pattern. Spend one or two attempts reviewing the replay before resetting again.
The fifth point is the one that decides whether a kill happens tonight or in two weeks. A player who resets on the first mistake will eventually learn the encounter, but they will learn it slower than a player who watches the replay, identifies which of the four real causes triggered the death, and adjusts one slot at a time.
How to read a failed attempt
After every death, the replay is the most useful tool in the game. Use the checklist below to turn a single attempt into a build adjustment.
- Note the exact move that killed the run. Was it a Bifrost combo, a teleport follow-up, a summoning phase, or a stagger punish?
- Identify the position when the killing move landed. Were you at range, mid-animation, or already committed to a heavy runic?
- Check the resource bar. Was rage empty, runic energy empty, or health already low before the killing move?
- Pick one slot to change. Resist changing more than one slot between attempts, or you will not know which change mattered.
- Repeat for two or three attempts. Patterns usually appear after three deaths from the same family of moves.
This is the difference between a player who farms the encounter for an hour and a player who farms it for an evening. The replay is faster than the attempt, and the information in the replay is more reliable than the memory of the attempt.
Resource management during the fight
Super bosses are designed to drain resources faster than the player can rebuild them. The list below is a simple rule set for the resource economy of this specific encounter.
- Spend rage on defense first, offense second. A saved rage bar is the only answer to a Bifrost opener that lands while you are out of position.
- Spend healing before the bar is empty. A panic heal at low health usually wastes the resource. A planned heal at half health usually survives the follow-up.
- Spend runic energy on interrupts. Damage-over-time runics are tempting, but a stagger or knock-up at the right moment is worth more than a thousand points of delayed damage.
- Spend Atreus’s summon on adds, not on the boss. The summon is the cleanest peel in the build, and the boss can be hurt with light combos while the adds are handled.
- Save the relic for the final phase. The final phase is where the encounter is won or lost, and a relic that has been used in the opener is a relic that is not there when it matters.
If the resource economy is wrong, the build is wrong. A perfect stat distribution will still lose to an empty rage bar.
When to accept a reset
Resetting is part of the loop, but the timing of a reset matters. A reset after a clean opener and a single mid-phase mistake is usually the right call. A reset after an opener that was lost in the first ten seconds is rarely the right call, because the problem is almost always in the build or the prerequisite checklist, not in the reaction.
Use the table below to decide.
| Where the run died | What to do next | Why |
|---|---|---|
| Opener, under 10 seconds | Review build and prerequisites | The build is wrong, the run is irrelevant |
| Opener, after 10 seconds | Reset and try again | Build is fine, reaction needs reps |
| Mid-phase, single mistake | Reset and try again | Pattern is learned, run was a coin flip |
| Mid-phase, repeated mistake | Review replay, change one slot | The build is missing an answer to that move |
| Final phase | Keep going | The build works, finish the kill |
A reset under ten seconds is almost always a sign that the build is the problem. A reset in the mid-phase is almost always a sign that the player needs more reps on that specific move. A reset in the final phase is rare and usually a sign that the relic or the rage bar was spent too early.
Connection to broader God of War Ragnarok progression
Gna sits at the end of a long progression arc that includes the main story, the side content in Svartalfheim, Alfheim, Vanaheim, and the post-game cleanup in Midgard. Players who reach the encounter with a half-finished build are usually the players who skipped the optional content in those regions. Optional content is not a detour from the build path; it is the build path.
For developers reading this as a case study, the encounter is a useful example of how a super boss acts as a final integration test for the entire progression system. Every gear slot, every enchantment, every resource, and every companion ability is tested in a single arena, and the encounter is balanced around the assumption that the player has engaged with all of those systems. A player who skipped one system will feel the gap in the opener, which is the design intent.
For players, the practical takeaway is that the time spent on optional content is the time spent on the build that will eventually fight Gna. The encounter is the report card for the rest of the game.
Frequently asked questions
What is the recommended enchantment setup for Gna?
The verified GamerGuides summary recommends pairing a Remedy of the Bifrost roll with a Regenerating Essence roll on the chest and wrist, and notes that Remedy of the Bifrost is the safer choice when Bifrost damage becomes a recurring problem. The full reasoning and the exact slot choices are covered in the Arkenyx Games developer outlook on GPU scaling page only as a related performance topic, not as a build source. Treat the GamerGuides page as the source of truth for the enchantment trade-off.
Can the fight be done with an early-game build?
No. The encounter is tuned for late-game stats, runic levels, and resistance values. An early-game build will be one-shot by the Bifrost opener and will not have the runic energy to interrupt the teleport recovery. The prerequisites section above lists the minimum gates.
How many attempts does a clean kill usually take?
That depends on the player’s experience with the game’s other late-game fights. A player who has already cleared the optional bosses in Vanaheim and Alfheim will usually take between ten and thirty attempts. A player who skipped that content will often take more, because they are learning the combat system at the same time as they are learning the encounter.
Should I use Spartan Rage offensively or defensively?
Defensively, until the final phase. A saved rage bar is the only reliable answer to a Bifrost opener that lands while you are out of position, and it doubles as a panic button for the teleport recovery follow-up. In the final phase, the boss’s combos get longer but the openings get larger, and a player who has saved rage can trade hit for hit in a way that is not safe earlier in the fight.
What is the most common reason players reset?
Chasing the teleport recovery. The camera turns, the player swings, and the follow-up lands. Holding a heavy runic attack for a beat after the shimmer stops that mistake cold, and it gives the camera time to settle before you commit.
Do I need to finish all side content before attempting Gna?
You do not need to finish all of it, but you need to finish the side content that feeds the build path. The most important regions for this encounter are Svartalfheim for the late-game resources, Alfheim for the runic upgrades, and Vanaheim for the companion upgrades. Midgard post-game content is mostly cosmetic and is not required for the build.
What should I do if the run dies in the first ten seconds?
Stop and review the build. A run that dies in the first ten seconds is almost always a build problem, not a reaction problem. The most common cause is a missing resistance roll on the chest or wrist, which leaves the Bifrost opener as a one-shot.
Is the encounter harder on a higher difficulty setting?
Yes. The encounter is tuned for the standard difficulty, and the higher difficulty settings multiply the damage and reduce the windows. A clean kill on the standard difficulty may take many more attempts on a higher setting, and the build priorities in this guide are written for the standard difficulty. Adjust expectations accordingly.
Can Atreus solo the adds?
Not reliably. Atreus can peel adds for a few seconds, but the encounter is designed to summon adds faster than Atreus can clear them on his own. Use Atreus’s summon ability, then return to the boss, and accept that one or two adds will reach you. Handle them with a light combo, not with a heavy runic.
What is the best reward for a clean kill?
The encounter is designed as a final integration test rather than a content unlock. The reward is mostly the build satisfaction of clearing the hardest fight in the game with a build that you tuned yourself. If you are looking for a specific gear unlock, check the post-fight screen for the exact reward, since the reward can vary by patch.




Leave a Reply